Home Cloud Server: Raspberry Pi 5 Upgrade
Building a home cloud server with Raspberry Pi 5: CasaOS, Nextcloud, RAID storage, and Cloudflare Tunnel.
I had a home server that had been running since 2017: a Raspberry Pi 3 Model B with a 2 TB external drive. It held up for a long time. But eventually, 1 GB of RAM, USB 2.0, and a 100 Mbps network connection were no longer enough. It was time to refresh both hardware and software. This post documents that upgrade process.

Hardware Selection
I went through a lengthy research process. Some products simply couldn’t be sourced — they don’t ship directly to Turkey, so the cart goes empty with no alternatives. From what was actually available, I weighed price-to-performance and settled on this list:
Raspberry Pi 5 8 GB with official power adapter: I expect 8 GB of RAM to last a good while longer. I went with the official adapter to avoid power-related headaches.
SanDisk MicroSDXC UHS-I A2 64 GB: I’m not planning to add an NVMe SSD in the near term, so I wanted to be confident about speed and capacity. A 32 GB A1 card probably would have been sufficient too.
Argon One V3 Case: Active cooling, aluminium chassis — and a few other nice touches.
Archgon MH-3643-JSC: A 4-bay external drive enclosure. Looks quality for the price.
Seagate IronWolf NAS HDD 4 TB (×4): Designed for 24/7 operation. In a RAID 10 setup, I get 8 TB of redundant storage. I considered SSDs but the cost multiplied quickly.
I assembled everything in about an hour and a half. The real work starts on the software side.
OS Installation
Installing an operating system onto the SD card with Raspberry Pi Imager is now a matter of a few clicks — select your device, OS, and target card, then proceed.
For the OS I went with Raspberry Pi OS 64-bit Lite. No desktop environment, a Debian-based distribution at around 400–500 MB. No unnecessary overhead for server use.
One important step during setup: when the imager asks about editing settings, go to the Services tab and enable SSH. If you’re doing headless first-access over SSH (no keyboard, mouse, or monitor), this is mandatory.
Insert the SD card, apply power. First boot can take 1–2 minutes. Once you’ve found the Pi’s IP address from your router’s admin interface:
ssh [pi_username]@[pi_ip_address]The default username is pi and password is raspberry. Change it immediately:
passwdStatic IP
To access the server at a fixed local address, a static IP needs to be assigned. This version of Raspberry Pi OS Lite doesn’t ship with the dhcpcd service, so the interfaces file needs to be edited directly:
sudo nano /etc/network/interfacesFor Ethernet:
auto eth0
iface eth0 inet static
    address 192.168.1.249
    netmask 255.255.255.0
    gateway 192.168.1.1
    dns-nameservers 8.8.8.8 8.8.4.4
For Wi-Fi:
auto wlan0
iface wlan0 inet static
    address 192.168.1.249
    netmask 255.255.255.0
    gateway 192.168.1.1
    dns-nameservers 8.8.8.8 8.8.4.4
    wpa-ssid "WiFi_Ag_Adi"
    wpa-psk "WiFi_Sifresi"
Save and exit (CTRL+O, CTRL+X). I prefer a full reboot to apply the changes:
sudo reboot nowTo verify the change:
ip aDNS
We already added nameservers in the static IP configuration, but for a machine acting as a server it’s worth explicitly confirming it’s using robust, reliable DNS:
sudo nano /etc/resolv.confnameserver 8.8.8.8
nameserver 8.8.4.4I went with Google DNS. Cloudflare DNS is a solid alternative.
There’s a catch: on reboot, the system may overwrite this file. To prevent that, make it read-only:
sudo chattr +i /etc/resolv.confWhen you need to edit it again:
sudo chattr -i /etc/resolv.confFirewall (UFW)
Running a server without a firewall is unthinkable.
sudo apt update
sudo apt install ufw
If you’re connected via SSH during installation, it will ask whether to allow SSH connections — confirm with Y.
Set the default rules first:
sudo ufw default deny incoming
sudo ufw default allow outgoing
Allow SSH:
sudo ufw allow ssh
sudo ufw allow 22
If you’re running apps with web interfaces, HTTP and HTTPS ports need to be open:
sudo ufw allow 80/tcp
sudo ufw allow 443/tcp
Enable UFW:
sudo ufw enableMore specific rules can be added as needed. For example, allowing only a specific local IP to reach a particular port:
sudo ufw allow from 192.168.1.100 to any port 3306To check current status:
sudo ufw status verboseTo delete a rule:
sudo ufw status numbered
sudo ufw delete <RuleNumber>
Storage Pool: RAID 10
Before bringing the drives into the system, formatting them with EXT4 is a good starting point.
List attached drives:
lsblkDrives will appear as /dev/sda, /dev/sdb, /dev/sdc, /dev/sdd, etc. Format each partition individually:
sudo mkfs.ext4 /dev/sda1Note that you specify the partition name, not the disk name.
Install mdadm for software RAID 10:
sudo apt update
sudo apt install mdadm
Create the 4-drive RAID 10 array:
sudo mdadm --create --verbose /dev/md0 --level=10 --raid-devices=4 /dev/sda /dev/sdb /dev/sdc /dev/sddCheck RAID status:
cat /proc/mdstatFormat the RAID array with EXT4:
sudo mkfs.ext4 /dev/md0Mount it:
sudo mkdir -p /mnt/raid10
sudo mount /dev/md0 /mnt/raid10
For automatic mounting on every boot, add it to /etc/fstab using the UUID. Get the UUID:
sudo blkid /dev/md0Then edit /etc/fstab:
sudo nano /etc/fstabUUID=<RAID UUID> /mnt/raid10 ext4 defaults 0 0Monitoring RAID status at regular intervals matters:
sudo mdadm --detail /dev/md0For monitoring and alerts:
sudo mdadm --monitor --scan --daemonise --mail=root@localhost --delay=300I plan to handle this part with a Python script: it’ll run nightly, collect SMART and MDADM data, analyse it, and generate a report. That’s a separate post.
In the Event of a Disk Failure
RAID 10 can tolerate a single disk failure, but you need to act fast. If a second disk fails before you’ve added a replacement, data loss becomes possible.
Identify the failed disk:
sudo mdadm --detail /dev/md0The failed disk will appear under Failed Devices. If State shows degraded, the RAID is not running at full capacity.
Remove the failed disk from the array:
sudo mdadm /dev/md0 --fail /dev/sdc --remove /dev/sdcAfter swapping in a physical replacement, confirm the new disk’s device name:
lsblkWipe the new disk:
sudo wipefs -a /dev/sdcAdd it to the array:
sudo mdadm /dev/md0 --add /dev/sdcMonitor the resync process:
cat /proc/mdstatOnce complete, verify status — State should read clean:
sudo mdadm --detail /dev/md0Finally, update the configuration:
sudo mdadm --detail --scan | sudo tee -a /etc/mdadm/mdadm.conf
sudo update-initramfs -u
Note: Local storage solutions carry software, hardware, and physical risks. Never rely on a single layer of backup for critical data.
CasaOS
CasaOS is a home server dashboard that lets you install and manage applications running as Docker containers. Installation is a single command:
sudo apt update && sudo apt upgrade -y
curl -fsSL https://get.casaos.io | sudo bash
This installs dependencies like Docker and Samba, along with the CasaOS web interface. Once complete, access it at:
http://[your_server_ip_address]On first launch you’ll create an admin account. After logging in, the Apps section shows one-click-installable applications. For any Docker app not listed, use the “Custom Install” button in the top-right corner of the Apps screen.
Database (MariaDB)
While each application has its own database solution, I wanted a dedicated MariaDB instance — so I can intervene directly at the database level if something goes wrong.
In the CasaOS interface, search for MariaDB under Apps and click Install.
Open the MySQL port in the firewall:
sudo ufw allow 3306/tcpThe default root password is casaos. Change it immediately:
sudo mysql -u root -pALTER USER 'root'@'localhost' IDENTIFIED BY '[rootP@s$WorD]';Change the casaos user’s password the same way.
Go into the MariaDB app settings in CasaOS, enter your updated passwords in the environment variables. Don’t forget to define a volume for the /var/lib/mysql path — otherwise, data will be lost when the container restarts.

Nextcloud
For personal cloud storage, Nextcloud. Search for it in CasaOS and install. While the installation runs, prepare the database Nextcloud will use:
sudo mysql -u root -pCREATE DATABASE nextcloud_db CHARACTER SET utf8mb4 COLLATE utf8mb4_unicode_ci;
CREATE USER 'nextcloud_user'@'%' IDENTIFIED BY 'password';
GRANT ALL PRIVILEGES ON nextcloud_db.* TO 'nextcloud_user'@'%';
FLUSH PRIVILEGES;
quitOnce installation completes, if the firewall blocks access to the Nextcloud web interface, check the URL for the port it’s using and allow it:
sudo ufw allow 10081/tcpAn important detail: Nextcloud accesses the filesystem as the www-data user by default. Keep that in mind — it’ll matter later.
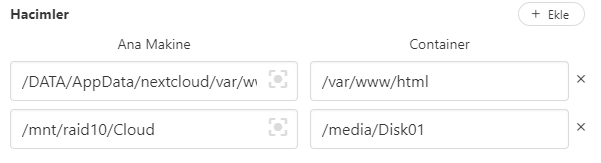
Create the directory on the RAID that Nextcloud will use:
sudo mkdir /mnt/raid10/Cloud
sudo chown www-data:www-data /mnt/raid10/Cloud
sudo chmod -R 755 /mnt/raid10/Cloud
In CasaOS, open the Nextcloud app settings, go to Volumes, and mount this directory into the container. I mapped it as /media/Disk01 — leaving room to attach additional disks later.
Save and restart. On the Nextcloud setup screen, after setting your username and password, open the Storage & Database section before clicking Install, select MySQL/MariaDB, and enter your database credentials.
After logging in, go to Administration Settings (top-right) → Administration in the left menu → External Storage. From here you can attach the RAID storage to Nextcloud.

A personal cloud on the local network is now ready.
Cloudflare Tunnel
The traditional approach to accessing a local machine from the internet is forwarding a port on your modem. That requires a static IP or DDNS, demands real effort to manage securely, and if your ISP puts you behind CGNAT it’s simply not an option.
Cloudflare Tunnel solves this from a different angle: your device opens an outbound connection to Cloudflare’s servers, and external traffic arrives through that connection. You don’t open any ports — Cloudflare provides the tunnel.
Before starting, you’ll need a domain with its nameservers pointed at Cloudflare.
Go to https://dash.cloudflare.com and click Zero Trust in the left menu. (First-time use requires registration; the Free plan is sufficient for personal use.)
Networks → Tunnels → Create a Tunnel. Keep “Cloudflared” selected, give the tunnel a name, and save. On the “Choose your environment” step, select Docker.
You’ll be given a command. I modified mine slightly:
docker run -d --name cloudflare_tunnel --restart always cloudflare/cloudflared:latest tunnel run --token [TOKEN]I removed the --no-autoupdate flag and added -d --name cloudflare_tunnel --restart always. Don’t share this command — it contains your token.
Once the container is up, your device will appear under “Connectors” in the Cloudflare interface. The next step is mapping a subdomain to a local IP and port, then clicking “Save Tunnel”.

You can route multiple domains through a single tunnel. To do that, go to Zero Trust → Networks → Tunnels, click “Configure” next to your tunnel, and under the Public Hostname tab use Add a public hostname to add new mappings.
Exposing Nextcloud to the Internet
You’ve defined a public hostname for Nextcloud in the Cloudflare tunnel, but when you try to access that domain, Nextcloud will throw an untrusted domain error. To fix this, add the address to Nextcloud’s trusted domains list:
sudo nano /DATA/AppData/nextcloud/var/www/html/config/config.phpFind the trusted_domains array and add your domain:
'trusted_domains' => array(
  0 => '192.168.1.249',
  1 => 'nextcloud.muhammetsafak.com.tr'
),
Save the file (CTRL+O, CTRL+X) and restart Nextcloud from CasaOS. It will now be accessible from outside your network.
Samba
CasaOS installs Samba as part of its setup. File sharing through the web interface takes a click or two — but there’s a catch: it shares publicly to the entire local network by default. Since I didn’t want that, I manage the Samba configuration manually. To avoid breaking CasaOS’s own config and to keep my settings isolated from CasaOS updates, I use a separate file.
First, create a Samba user:
sudo smbpasswd -a [user_smb_username]Create my own configuration file:
sudo nano /etc/samba/smb.home.conf[Cloud01]
comment = Home Cloud 01
path = /mnt/raid10/Cloud
browseable = Yes
read only = No
guest ok = No
public = No
valid users = [user_smb_username]
create mask = 0777
directory mask = 0777
force user = www-dataA few key fields in this configuration:
[Cloud01]: The share name. Accessible as\\192.168.1.249\Cloud01.path: The directory being shared.read only = No: Users can read, write, and delete.guest ok = No/public = No: Only defined users can access it.valid users: Samba users permitted to connect.force user = www-data: All operations run under thewww-dataaccount, keeping file ownership consistent with Nextcloud.
Include this configuration in the main Samba config:
sudo nano /etc/samba/smb.confAdd the following at the very end of the file, indented with a TAB (so my config also falls under [global]):
include=/etc/samba/smb.home.confRestart Samba:
sudo systemctl restart smbdSetup complete. Additional applications on CasaOS — download managers, ad-blocking DNS, and more — can be installed with a single click. Assembling the hardware took about an hour and a half; writing this post took two days. Hopefully, for you, this reverses that ratio.
Comments
Sign in with your GitHub account to join the discussion. Comments are stored in GitHub Discussions.