Docker containerization: installation and basic usage
A hands-on beginner's guide to Docker's container architecture, core commands, and the concepts of volumes and networking.
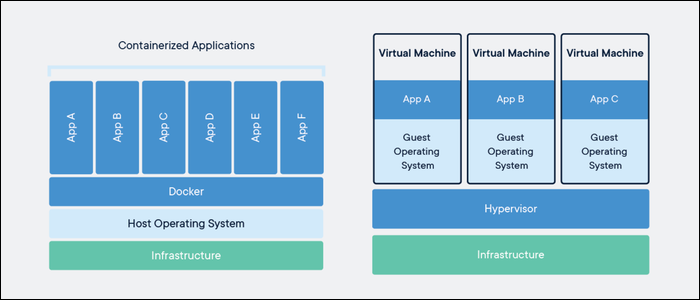
The first thing that confused me when I looked at Docker was that the word “virtualization” had become synonymous with VMs. In the context of VMware or VirtualBox, virtualization brings to mind a full OS image, a separate kernel, and a hypervisor keeping everything running. Docker sits in a different place: it uses a container architecture and shares the host operating system’s kernel. That sharing model makes containers far lighter and faster to start than VMs.
Each container carries its own dependencies, libraries, and runtime environment inside itself. Docker acts as the layer that mediates communication between the host kernel and the container. This architectural difference is directly related to many of the practices we use today — from development environments to production deployments.
Installing Docker on Windows
Before getting to the installation, there are a few prerequisites. I’m installing on Windows 11 Home; the steps are similar on other editions.
You need to enable hardware virtualization in your BIOS settings. The exact option name varies by motherboard, but you’re generally looking for Hardware Assisted Virtualization and Data Execution Protection. If you bought a pre-built system, these are usually already enabled.
Next, enable WSL2 support in Windows. Go to Control Panel > Programs > Turn Windows features on or off, check Windows Subsystem for Linux and Virtual Machine Platform, then restart. After the restart, run Windows Update — the WSL2 kernel arrives as an update.
To verify WSL status:
wsl --statusIf you run into errors, Microsoft’s manual installation guide walks through it step by step.
Once your environment is ready, download and install Docker Desktop from docker.com/get-started. You don’t need to change anything during installation; the defaults work. At the end it will ask you to log out and back in, after which Docker will start automatically.
To verify the installation, run in your terminal:
docker versionIf you see both client and server information, Docker is running. I’d also recommend creating a Docker Hub account — you’ll need it to access official images and publish your own: hub.docker.com.
Core Concepts
Clarifying three terms before jumping into commands makes everything easier.
An Image is a package that bundles one or more components. The operating system, libraries, application — all defined inside the image. Images are published and distributed via Docker Hub. Think of it like source code.
A Container is an isolated, running instance derived from an image. The image is the source code; the container is that code in execution. You can spin up as many containers as you want from the same image.
A Docker Registry (or Docker Host) is the software or service that stores images and runs containers. Docker Hub is the most well-known public registry; you can also set up your own private registry.
Core Commands
Image Operations
Search for an image on Docker Hub:
docker search phpList only official images:
docker search --filter is-official=true phpPull an image:
docker pull phpUse a tag to pull a specific version:
docker pull php:7.4-cliList installed images:
docker imagesFilter for a specific image:
docker images java:8Remove an image:
docker rmi phpContainer Operations
The most common way to create a container is the run command. It combines pulling the image, creating the container, and starting it in one step:
docker run --name dbserver mysqlIf the mysql image hasn’t been pulled yet, it pulls it first, then creates and starts a container named dbserver.
The -d flag runs the container in the background (detach mode):
docker run -d mysqlUse -it to attach to the container’s interactive terminal:
docker run -it --name dockerbash ubuntu
Use --rm for one-off containers you want to automatically remove when they finish:
docker run --rm php php -vList running containers:
docker psList all containers (including stopped ones):
docker ps -aStop a container:
docker stop dbserverRemove a container:
docker rm dbserverRename a container:
docker container rename dbserver mysqlserverView container logs:
docker container logs dbserverInspect container details:
docker container inspect dbserverExport a container’s filesystem as a tar archive:
docker container export -o /backup/db.tar dbserverPort mapping with the -p flag — external port:internal port:
docker container create -p 3333:3306 mysqlPass an environment variable with -e:
docker run -e MYSQL_ROOT_PASSWORD=123456 mysqlAttach your terminal to a container running in the background:
docker attach dbserverVolume Mapping
When you stop a container, any changes you made inside it are lost by default — each time the container starts fresh from its image. To persist data, you use volume mapping: you map a directory on the host to a directory inside the container. It’s specified with the -v flag in the format outsideDir:insideDir:
docker run -v /opt/datadir:/var/lib/mysql mysqlIn this example, MySQL’s data directory is mounted to /opt/datadir on the host. When the container restarts, the data is still there — it isn’t lost. Mounting your project folder into a container in a development environment works through exactly the same mechanism.
Network Types
Docker has three default network types:
Bridge: The default network type, where each container gets its own local IP address (typically in the 172.17.0.* range). It provides isolation between containers while still allowing them to communicate with each other.
docker run --network=bridge mysqlNone: For containers that are completely isolated with no network connectivity to the outside world.
docker run --network=none mysqlHost: The container uses the host’s network stack directly. Port mapping is no longer needed, but isolation is gone as well.
docker run --network=host mysqlCreating a Custom Network
If you want containers on the same network to reach each other by name, create a user-defined network:
docker network create --driver bridge --subnet 182.18.0.1/24 --gateway 182.18.0.1 wordpress-networkList networks:
docker network lsRemove a network:
docker network rm wordpress-networkInspect network details:
docker inspect wordpress-networkStart a container on a specific network:
docker run --net wordpress-network mysqlDocker’s real power goes beyond the individual commands I’ve covered here — there’s Docker Compose for managing multiple containers together, and tools like Kubernetes for production environments. But getting to those steps is harder without a solid grasp of these basics. In my experience, the best way to start using Docker in a development environment is to add a docker-compose.yml to an existing project and define its services as containers. That hands-on experience quickly makes it clear how Docker actually works.
Comments
Sign in with your GitHub account to join the discussion. Comments are stored in GitHub Discussions.